Monday, April 10, 2017

Albers Exercise 6, 7 and 8. Due Wed. April 12th

Class, Because of time constraints, we are skipping exercise 5. For Wed, please do Exercises 6 and 7. Each exercise should be mounted to mat board with 2" border. 

DUE WED, APRIL 12th. 

Exercise 6

 consists of 4 different compositions. Each composition should measure 4" x 2.5" overall. NOTE:  FOR EXERCISE 6 ONLY, YOU MAY USE ILLUSTRATOR, OR ANY OTHER MEDIA, INSTEAD OF PAINT SWATCHES. Regardless of the medium you choose, you CAN NOT blend colors. They must all be solid and limited to 4 colors used across all 4 compositions

Ex. You could use the following paint swatches in 4 different compositions that communicate very differently: canary yellow, periwinkle blue, sun red, lemon. Each composition would use only these 4 colors, but in different quantities, in different placement, and interacting differently.


Exercise 7

THIS MUST BE DONE USING PAINT SWATCHES. Your composition must measure 3" high x 12" wide. Cutting clean and straight will be important. The goal is to use color repetition and proximity to create the illusion of more colors that you are using. YOU WILL ONLY USE THREE DIFFERENT COLORS of paint swatches. How many more colors can you create through Visual Mixture? Challenge yourself to make at least 6 colors appear.

Exercise 8

 Exercise is done with 3" squares and 1" squares. Should be mounted with 2" border. 
 Do your best with this one. You will need to pick three colors that give the illusion of 4 colors. The small 1" square is the color that will appear to shift into a 4th color depending on the ground (large square surrounding it). 

Do this exercise once with a shift in value (grayscale)  and another time with a shift in hue. 


Wednesday, April 5, 2017

Required Research: Interaction of Color historical background. Due Monday, April 10th.

Please watch the two videos on the Bauhaus and Black Mountain College and visit the website on Josef and Anni Albers.


https://safeshare.tv/x/ZWO0wx53r6E

https://safeshare.tv/x/G3xSAew7vEU

http://www.albersfoundation.org/artists/biographies/

Josef Albers- Interaction of Color: Exercises 2, 3 and 4. Due Monday, April 10th.

Project Overview

Using the color swatches you brought from the paint store, complete the following exercises. All exercises should be mounted to mat board with a 2" border. The color swatches can be glued directly onto mat board or first onto bristol board and then mounted to the mat board.

A new X-acto blade should be used.

Evaluation

You will be evaluated on two components
50% Craft- cutting, layout, gluing, presentation, following directions.
50% Demonstration of desired effects- Study should achieve the stated effects.

Due Date

All exercises must be mounted and ready for critique at start of class, Monday, April 10th. 

Notes

There are three basic attributes of color- Hue, Value, and Chroma. Identify how each of these exercises use the relationship between the attributes of colors to create the desired effects. Once you can identify the color relationships, you will be able to choose colors of your own to replicate the effects.

Here are more notes and examples for the Josef Albers Exercises 2.


Exercises 3 & 4

Notes: the larger squares are 2" x 2" and the smaller squares are 1" x 1". So, for exercise 3 you will need to cut two squares 2" x 2" and remove a 1" corner from each of these. In the empty space, place your 1" square of the appropriate color. The goal is to make the bottom right-hand color appear to be floating above the upper-left color. If this is done correctly, you will create an illusion of transparency and 3-dimensional space/depth.

Keep in mind the rendering device of atmospheric perspective- as objects move away from the viewer they decrease in both chroma and contrast. Therefore, a prismatic color may appear "closer" to the viewer while a chromatic gray may appear "more distant".


Wednesday, March 29, 2017

Assignment 9: Mounting Color Charts. DUE MONDAY APRIL 3rd.

This image shows how you will subdivide the 4 pages printed out in class. Each of these smaller units will be individually mounted to mat board. These 7 charts will be mounted to edge (no border)


The following details must be followed:

1. Value scale goes from light to dark with the lightest value at the top of the chart. 
2. All primary charts will have yellow at the top. 
3. Color wheel will have red at the top. 
4. Corresponding achromatic grays for color wheel should be cut to 1" x 1/2" and mounted on edge of corresponding hues. 
5. Chromatic scales stay together as two sets (3 scales per set). The chromatic scales are arranged from light to dark in value (lightest value at the top of page, ex. yellow). One page will contain the three warm colors, the other page will contain the three cool colors. All are arranged like this:
Top (color with lightest value) bottom (color darkest value)
Left (Prismatic color) Right (Achromatic color)


THE 7 CHARTS WILL NOT BE MOUNTED TO ANYTHING ELSE. THEY STAY AS 7 SEPARATE CHARTS.  

CRITIQUE IS MONDAY, APRIL 3RD. All things must be mounted and presented for critique by 10:40am. 


Monday, March 20, 2017

Assignment 8: Hue, Value and Chroma Charts

Schedule

Due Monday, March 20th- 
1" swatches for the following:
- Color wheel and corresponding achromatic grays
- Colors for psychological, historical, and subtractive primaries
-achromatic greys for new value scale (11 steps)

Due Wednesday, March 22nd- 
1" swatches rough-cut for the following:

  • 10-step chromatic scale in yellow (only chroma shifts, no shift in value or hue)
  • 10- step chromatic scale in violet (only chroma shifts, no shift in value or hue)
  • 11- step achromatic scale (no chroma, even steps in value based on chart)

Note: cut your swatches to 1" height, but leave the other sides longer. 

Due Monday, March 27th-
All of the following must be completed for start of class. Please bring rubber cement, xacto, blades, and ruler to class. You will be mounting in class. Must have the following 1" swatches COMPLETELY CUT AND READY TO MOUNT at the beginning of class:

  • 10-step chromatic scale in yellow
  • 10-step chromatic scale in violet
  • 10-step chromatic scale in blue
  • 10-step chromatic scale in orange
  • 10-step chromatic scale in green
  • 10-step chromatic scale in Red
  • 11-step Achromatic Gray Scale
  • 12 colors for color wheel
  • 12 achromatic grays that correspond to color wheel
  • 4 colors for psychological primaries (Red, Green, Yellow, Blue)
  • 3 colors for historical primaries (Red, Yellow, Blue)
  • 3 colors for subtractive primaries (Magenta, Yellow, Cyan)
Due Wednesday, March 29th- 
FINAL CRITIQUE- Everything Mounted and ready for presentation.


From David Briggs website

"Mixing with grey is commonly also accompanied by a shift in hue (Fig. 6.3.3B), generally in the same direction as that seen in mixing with white paint. These shifts are accentuated if the grey is somewhat bluish, as results from mixing most black paints with white. A perfectly neutral grey (made for example using raw umber plus a black as the darkener) will eliminate this latter component of the shifts, but not the hue shifts that are due to the undertones of the coloured paints. Using a grey to reduce chroma is an important tool that keeps the painter in control of the value of the mixture, whereas the traditional recipe of mixing with the complementary tends to surrender control of the value to the paint.

Adding black paint alone to a paint mixture typically reduces saturation as well as chroma and value, and thus yields shadow colours that are too low in chroma to be correctly related to the lights. Strongly coloured objects remain at high saturation even at their lowest values, which may need to be painted using a very high proportion of colourant; pure black paint, being a very low value neutral (grey), is unsuited to represent the lowest values of such objects.

Darkening with black may also cause a hue shift that needs correction, but this problem occurs with any darkener. The main shifts are red > purple, and orange > yellow> green, both of which can be corrected by dragging the hue back with a trace of a strong orange or scarlet colorant."


From David Briggs website:

"Ideal yellowmagenta and cyan colorants would be the optimal primaries for paint mixing, if such pigments existed. However, even today our best magenta and cyan pigments are well towards red and blue respectively, compared to the ideal magenta and cyan subtractive primaries. No high-chroma pigments are very close to an ideal magenta hue.


The closest high-chroma oil painting pigment is quinacridone magenta (PV 19), which is distinctly redder than ideal magenta. 

The closest popular oil painting pigment to an ideal cyan is the green shade variant of phthalocyanine blue (PB 15.3), which similarly is distinctly bluer than an ideal cyan. 

Note: Cobalt green is closer to ideal cyan in hue, and does mix some blue-green colors not obtained using phthalocyanine blue alone as the primary, but yields fewer colors in the bluish range. It is also more expensive, and being opaque is less suited to mixing dark colors. 

Yellow pigments are available in an essentially continuous range of hues, and a pale or lemon yellow seems to provide the optimal gamut of colors."

Sunday, March 12, 2017

Research: Introduction to Color Theory. Please read before Wed, March 15th

You have three readings to do for class on Wed., March 15th. They are all available on this website


Reading 1- Intro to Color Theory

Please start by reading the prologue. It's a great resource for understanding color theory and it's development. Don't worry if you don't understand it all- there is a lot of information here. Also, you can listen to the writer reading it in the video below


Reading 2- The Dimensions of Color

Read the section titled, The Dimensions of ColorWe will use the terminology presented in the reading to discuss the three attributes of color. These attributes are applied to both additive and subtractive color. The author uses the terms Colors of Objects (ex. paint or ink), and Colors of Lights (ex. a computer screen). The three Dimensions of color are: 

1. Hue
2. Chroma/Saturation
3. Value/Brightness


Reading 3- Paint Mixing Principles

The last reading for Wednesday will be the part on mixing paint. Please read the sections on whitegreyblack and hues. Again, don't worry about not understanding everything. Just be sure to understand the basic ideas. 

For Class on Wed, March 15th

Please bring your bristol board pads to class along with your gauche and painting supplies. We will be painting in class. 

Here is the gouache you should have purchased. I know it's expensive, so talk to me if you have issues. Maybe you can go in with another student to buy it. This should be the last material you will have to purchase. I will  continue to try and supply donated matte board and other materials for you. 

Other resources on Color Theory


Tuesday, February 28, 2017

Assignment 7: Greyscale- Free Composition. Due Monday, March 6th

Project Description

Design and execute a composition in greyscale with the unused paint swatches left over from your black and white value scale. Refer back to your notes regarding the elements and principles of design, and apply these to create an arrangement of line and shapes that move the eye around the page. 


Specifications

Minimum 8 inches x 8 inches overall. You can make it larger if you want.
Mount the composition on matt board with a 2 inch border around all sides. 
Name on back. 

NO pieces may overlap. I originally said this in class but I am going to allow you to layer your swatches. You MAY overlap the painted paper swatches. You man also tear, rip, scratch, etc. Be creative, thoughtful and intentional. 

The composition may be representational or abstract. It just has to be good. 

Schedule

Wed, March 1st- 
In-class work day. Bring materials to work and a sketch of the composition. 

Mon, March 6th @ 10:30am. 
Project Due On-Line (NO CLASS)
All work must be posted to your blog by 10:30am on Mon, March 6th. Each student will review ALL other students in the class. Use the comments sections on the blog to post your comments to your classmates' work. This required feedback will replace our regularly scheduled in-person critique. It should take you about two hours to do. 

All work posted after 10:30am will be marked as late and reduce a full letter grade. 

Tips

Focal Points- 
Create at least three different focal points in the composition and arrange them on the page to help move your eye around the entire space. Positioning them in a triangular configuration is a common approach. 

Hierarchy- 
Establish an order of importance to all the elements (lines/shapes) in your design. 
What is most important? 
How will you establish this?
Answer: Contrast

What is least important? 
How do you establish these? 
Answer: Similarity with the ground and with the majority of elements on the page. 
What is the purpose of these elements?  
Answer: To support the most important things. 

Figure/Ground-
Remember that you SIMULTANEOUSLY create figure and ground as soon as you make a mark in space. The moment this happens, you define both the mark, and the space it resides in. If you keep this in mind, you will not make the mistake of drawing things on a "background". Instead, you will have interesting positive AND negative shapes. Interesting Figure AND Ground. Test your composition by studying the negative shapes in your composition. Are they as important and essential as your figure/subjects?

Framal Reference-
Have you considered the way your composition works with the frame of your page? When an element/shape is confined within the frame it feels small/contained. When an element/shape extends beyond the frame it feels large/expansive. Use this to your advantage. Also consider gravity and the fact that we read from left to right. 

Atmospheric Perspective-
As things move back in space there is less edge contrast and less overall contrast. In addition, the colors move toward achromatic gray. Your swatches are all achromatic treys (grays without color). Can you introduce more swatches of muted and prismatic colors to bring things to the front/closer to the viewer? Yes

Similarity and Contrast-
Use similarity to create unity and contrast to create interest. This is a balance. Too much similarity = boring. Too much contrast = discord. 

Texture-
You got it... use it. a bad paint swatch from the last project could be a great thing here. 

Create the unexpected. Have fun. Use those swatches!


Wednesday, February 22, 2017

Assignment List for Semester

Spring 2016- List of assignments and exercises

Assignt 1a-What's up/Mashup (magazine- first attempt)

Assign 1b- What's up/Mashup (magazine- second attempt)
   
Assign 2- Figure Ground Studies
     Square (Stable, Reversible, Ambiguous)
     Circle (Stable, Reversible, Ambiguous)
     Rectangle (Stable, Reversible, Ambiguous)

Assign 3- Symmetry (2 parts)
     6 emotion studies
     Animated gif (Final Project)

Project Series- Value Scale and Tessellations (3 Assignments)
     Assign 1- Painting Greyscale Tiles
     Assign 2- Greyscale Value Scale
     Assign 3- Greyscale Composition with extra swatches

Project Series- Hue, Value, Chroma (4 Assignments)
     Assign 1- Three Primary color charts
     Assign 2- Achromatic grey value scale 
     Assign 3-  Color Wheel
     Assign 4- Three Chromatic Scales

Interaction of Color- Joseph Albers Exercises (8 Exercises)
     Ex. 1. Hue as Value
     Ex. 2. Boundaries
     Ex. 3. Transparency
     Ex. 4. Color Manipulation
     Ex. 5. How Much to How Much
     Ex. 6. Color Climate
     Ex. 7. Visual Mixture
     Ex. 8 Three Colors Look Like Four

Final Projects (2 Assignments)
     Assign 1- 3 Color Compositions in mixed media (application of all theory and techniques covered in course)
     Assign 2- Emotion Animation (application of theory and techniques)

Slight adjustments may be made as necessary. Students will be amply notified if this occurs. 

Assignment 6: Value Scale- Greyscale. Due Monday, Feb. 27th


Project Description

In gouache, create a value scale in 11 steps total starting with white (from the tube) and ending with black (from the tube). For the value scale, you will need 11 tiles total. Each tile will be painted a different value from black to white. The value must shift evenly between tiles. 100%, 90%, 80%, 70%, 60%, 50%, 40%, etc. Use the provided color wheel I gave you for reference. 

Part One- Painting Tiles for Tessellating Value Scale. Due February 22.

1. Draw your pattern/tiles

Lay out your pattern on bristol board, leaving a ½" gap between each tile. The gap will give you space to paint beyond the lines and will make it easier to cut your tiles in the next step. 

Take advantage of drawing triangles and a straight edge if you will be making tiles based in triangles, such as rhombus, equilateral triangle, hexagon. All of these are based in the equilateral triangle and can be drawn simply with a 30/60/90 drafting triangle

If you are able, you may draw your pattern in illustrator and have it printed on the bristol. You will have to check with the print lab to see 
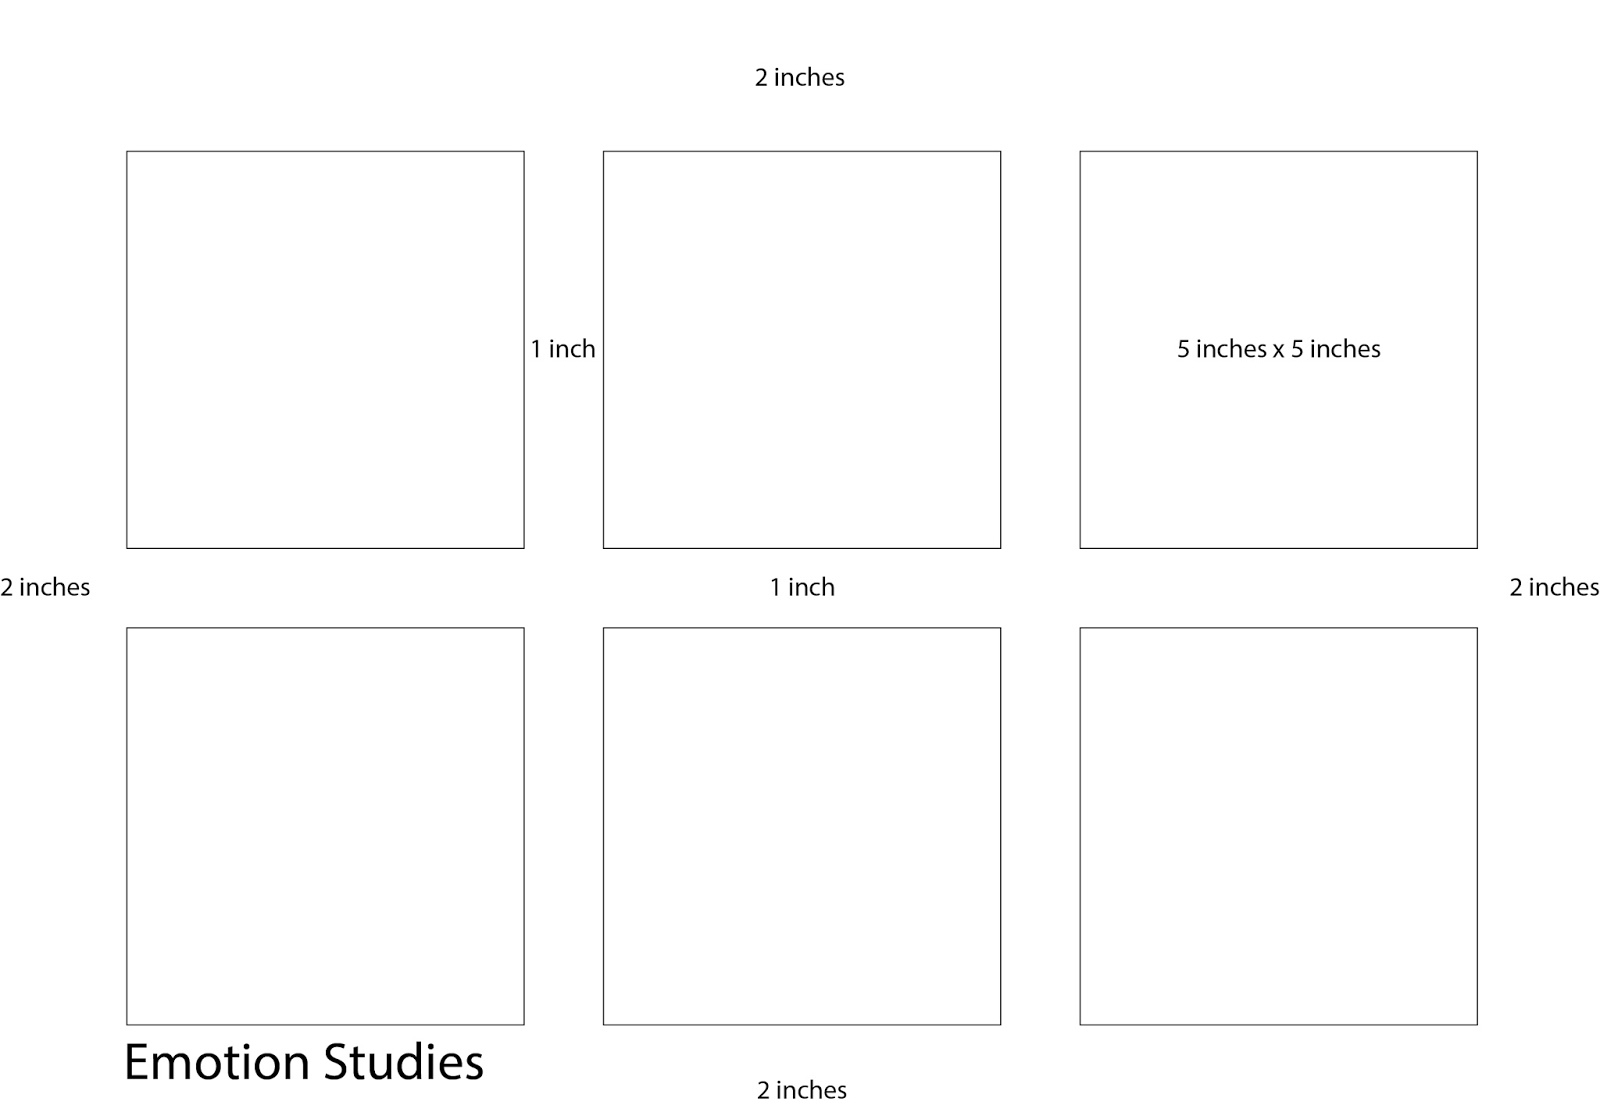
they are wiling to do this. See example of layout below:

Lines drawn at 90 degree angles with ½" spacing


3. Paint your tiles

You will need more than 100 tiles to get the 11 for your value scale. This is because not all of them will be acceptable in terms of correct value, or painting technique. Remember, your goal is to make these tiles look like they were painted in a factory (no brush strokes, no streaking). 

When painting your tiles, be sure to watch some videos on how to mix gouache. When I gave the demo in class, I told you to watch out for a few things. I have listed them here:
  • Don't waste paint- Start with white, add black. 
  • Use a wash brush (¾" or 1") 
  • Mix paints on a white surface (you may use a large ceramic dinner plate, plastic disposable plate, or disposable palette
  • Have two cups of water for cleaning your brushes. Keep them clean. 
  • Minimize Streaking- Clean brush thoroughly between painting different values.
  • Minimize Streaking- Mix paints thoroughly on palette- adding small amounts of black to the white.
  • Minimize dry brush or water color effect- Maintain proper consistency of paint (not too much water, or too dry)
  • Minimize Streaks- Load brush evenly (both sides of bristles). 
  • Minimize Brush strokes- Lay paint down evenly (not too thick or thin). Paint in only one direction. 
  • Don't stack paint tiles while drying. 
Here's a person that documented a similar project and posted her process. Your's will be the same with the exception that you may choose a different shape for your tiles. This is the tessellation part of our project. She did her's with squares. 

The painted tiles are due Wed, Feb 22nd. You will need to bring all 100+ tiles to class, uncut


Part Two- Assemble Tessellating Value Scale. Due Monday, Feb 27th

Here is the layout for the value scale. Please use the black mat board provided in class. Your mat board will be cut to 5 inches x 15 inches. 


Process
1. Cut swatches in long 1" wide strips
2. Compare the swatches to the value scale I gave you.
3. Mark the closest value (ex. 30%, 40%) on the back of the swatch.
4. Cut the swatches from the 1" wide strips. Be sure to leave extra room beyond 1". 
5. Choose the best swatches to accurately represent the 11 steps in value.
6. Lay them out and double check (before gluing)
7. Draw two parallel lines 1" apart on a clean sheet of bristol board.
8. Glue the bristol board and the back of your swatches.
9. Carefully attach the swatches to your pre-glued bristol board.
10. Cut the newly glued 11" tall value scale down to 1" width. 
11. Using pencil, lightly mark your mat board where the value scale will go.
12. Glue the mat board.
13. Glue the back of the value scale.
14. Attach the value scale to the mat board using a ruler as a guide. 
15. Clean ALL excess rubber cement from mat board and value scale. 
16. Write name on back. 

Tuesday, February 7, 2017

Assignment 5: Mounting F/G studies. Due Feb 13th.


This weekend you will fix/re-do anything that needs to be corrected with the first Figure/Ground studies (square, circle, rectangle/thick line). Once you are happy with the outcome, please mount them on matt board provided in class.

Tip: use the skills you are learning with flash (vector drawing) to see if can improve your compositions and make them better. Drawing in illustrator is very similar to drawing in flash/animate.

For figure ground studies, leave a 1" margin between compositions and a 2" border around the edge.  Mount each group of studies on a separate matt board. Ex. squares on one matt board, etc. 

Put name on back and clearly label each assignment.

Next week we will begin painting with gouache. Please bring the following to class with you:
  • black and white gouache
  • 1" gouache paint brush
  • wax paper, aluminum foil, or disposable pallet paper
  • two plastic containers for cleaning brushes 
  • pencil
  • ruler

Thursday, February 2, 2017

Final Project: Emotional Animation (Shape Shifter). Multiple Deadlines

Emotional Animation

For this assignment, you will start with the six emotion compositions and create an animation which morphs between all six of them. Either use Adobe Flash, Adobe Animate or Adobe After Effects to create the project start-to-finish, or use a combination of Photoshop, Illustrator and analogue processes to create your animation. My recommendation is to use Flash or Animate. After Effects will give you the most options for motion effects, but is more difficult to learn. Illustrator and Photoshop will make the process more cumbersome and will require more steps. 


Goals

Create an interesting narrative LOOPING animation by carefully considering the transitions between your compositions and by paying close attention to both the positive and negative shapes in the six compositions.  Be sure to consider: 
Rhythm/Pacing/Timing and Proximity.  (which emotions blend into each other and which emotions are farthest from each other). 

Sound may be introduced into your animation to help communicate the different emotions. This is easy to do in Flash/Animate/AfterEffects.


Specifications

1 to 3 mins total run time. 
Looping.
File Type- Animated gif or .mov file. 

You MAY NOT shape tween or blend entire compositions into each other. You have two break the compositions down into smaller parts. You can group objects in your compositions to blend/tween together, just not the whole compositions. 


Assessment

You will be assessed on the quality of your animation- does everything look intentional? Good Transitions? Details? All shapes represented and in motion? 
Creativity- how you choose to animate and morph one composition to another
Communication- how well the animation reinforces the emotions you are trying to communicate through the compositions. 
Technical- Does the animation work? Can it play on your blog? Is it between 1-3 min.? Does it loop? No glitches?

Due Dates

Monday, Feb 6th- 
Animation from One Emotion Composition to another- exported as looping .gif or .mov
example- anger to joy. 
Minimum 10 second loop.
Uploaded to your website/blog.

If you have a computer with the software, please bring it to class. We will try and get access for anyone who does not have a computer for class work time. 

Wednesday, Feb 8th- 
Animation of two emotions- exported as looping .gif or .mov
example- anger to joy to contempt. 
Minimum 30 second loop.
Uploaded to your website/blog.

THE REST OF THE SCHEDULE IS BEING REWORKED DUE TO THE  STEEP LEARNING CURVE. MORE TIME WILL BE GIVEN BEFORE FINAL PROJECT IS DUE. 

Monday, Feb 14th- 
Final Project Due. 
Animation between all six emotions. 
Minimum 60 second loop. Can be up to 3 min. loop. 
Uploaded to your website/blog. 

Brief statement on Blog-
This should be three paragraphs or bullet point lists describing the process- 
Paragraph/list one- 
what you learned technically with the software
Paragraph/list two-
 what you learned regarding use of the elements and principles of design in motion. 
Paragraph/list three- 
how the decisions you made with your animation worked toward communicating the emotions of your compositions. Think about type of movement (smooth or choppy), types of interactions between the individual elements in the compositions, proximity of one composition to the next (similarity or contrast, etc) and sound. 


Thursday, January 26, 2017

Assignment 4: Mounting Emotion Studies. Due Wed, Feb 1st

Matting your Emotion Compositions- Due Wed, Feb 1st

Mount your compositions to the mat board provided in class; follow the diagram included below. You will leave a 2 inch border around the perimeter of the matt and a 1 inch gutter/space between each composition. 


Assessment


You will be evaluated on the following criteria:

Following Directions-
Correct sizes and spacing according to mounting diagramWritten components on the back- did you include the emotion, f/g relationship, and type of balance for each composition?

Craftsmanship- 
Are the 5x5 compositions lined up and straight?
No glue left on surface? 
No pencil marks?

Design/Placement-

Did you use the design principles to create an interesting layout on your mat board? 
There are six compositions; please organize them well. Use repetition of color, line, size relationships, value, etc. 


Assignment 3: Six Emotion Composition Studies. Due Monday, Jan 30th.

Intro

For this assignment you will create six duotone compositions, each on 5" x 5" quality paper. Your six compositions will seek to communicate one emotion from the list provided. Each 5" x 5" study will communicate a different emotion from the list below using only basic elements of design (nothing representational) and only two colors per composition (white paper is a color).

The American Psychological Association recognizes seven basic human emotions which are found throughout all cultures and are considered to be universal. They are: 


  • joy
  • surprise
  • sadness
  • fear
  • contempt
  • anger
  • disgust

Required Materials


  • Colored paper- paint chips from paint store or art paper- ex. Canson, Strathmore, etc.
  • Rubber cement
  • Metal ruler
  • Xacto knife and fresh blades
  • Cutting Mat

Specifications

1. Your six composition will be 5 inches x 5 inches. 
2. Choose six emotions from the APA list of seven emotions included above. 
3. Figure/Ground and Balance- you must use each type of F/G relationship and each type of balance at least once in the six compositions.
4. Your paper should be professional artist quality (no construction paper, printer paper, or thin papers)
5. Back of each composition should be labeled in pencil in the upper left-hand corner of the page. Please include the following information:
  • Your name
  • Date
  • Emotion (from the list on this page)
  • Type of F/G relationship (Stable, Reversible, Ambiguous)
  • Type of Balance (Symmetry, asymmetry, Radial, Crystallographic)


Goal

Your goal is to create visually interesting compositions that effectivly communicate these base emotions using what you have learned regarding figure/ground relationship, the elements and principles of design, semiotics, and what you have read in the Wong text. 

Assessment

You will be evaluated on the following criteria:

  • 30% Composition- visually interesting, good use of F/G, design elements, all negative and positive space is well though out and the shapes all appear necessary
  • 30% Craft- clean precise cuts, gluing, no pencil marks.
  • 30%Communication- composition clearly communicates the intended emotion. 
  • 10% Following directions- proper labeling, correct size, used all types of f/g and balance at least once, correct paper, etc. 

Due Date


Monday, Jan 30th. Critique begins promptly at 10:10am. Please have your work pinned to the wall by that time.


Class Schedule for Monday

After critique I will do a demonstration on proper way to mount artwork to mat board.
You will complete matting of your Emotion studies to be turned in on Wed. On Wed, we will be documenting your work in class. I will do a demo on simple documentation of flat (2-D) work.


Please note: All figure/ground studies you are have completed so far will also need to be mounted. You will have the weekend to complete them before turning them in. Only the matted emotion studies will be turned in on Wed. You will take them home with you after the critique.